There’s nothing quite like the sheer frustration of reaching into your power tool box, desperate for that specific drill bit or that crucial impact driver, only to be met with a tangled mess of cables, loose bits, and mystery screws.
Trust me, I’ve been there more times than I care to admit, especially in the middle of a demanding weekend project when every second counts. It’s not just about aesthetics; a chaotic toolbox is a productivity killer, potentially leading to damaged tools, wasted money replacing lost parts, and even unsafe situations.
But here’s the good news: organizing your power tools isn’t just about neatness; it’s about optimizing your workflow, extending the life of your valuable equipment, and genuinely making your DIY life easier and more enjoyable.
Forget the old ‘dump and pray’ method. We’re in an era where innovative modular storage systems, like those from Milwaukee Packout or DeWalt ToughSystem, are literally changing the game, allowing for custom configurations that fit your exact needs.
These aren’t just boxes; they’re smart, stackable solutions designed for efficiency and quick access. Looking ahead, imagine integrating RFID tags for digital inventory tracking – the future of tool management is already at our fingertips, and starting with a solid organizational foundation is key.
You’ll not only save precious minutes and avoid costly replacements, but also regain that sense of calm and control over your projects. Let’s find out exactly how to achieve that perfect, productive setup.
The Unveiling: Taking Stock of Your Power Tool Mayhem

Before you even think about buying a single storage bin or label maker, the absolute first step in this journey of transformation is to confront the current state of your power tool collection. Trust me, I’ve been there, staring at a mountain of drills, saws, and grinders, each one seemingly trying to out-tangle the other in a Gordian knot of cords and accessories. It’s an exercise in brutal honesty, but it’s utterly crucial. You need to pull *everything* out. And I mean everything. Empty every drawer, every shelf, every corner where a rogue impact driver might be hiding. Lay it all out on a workbench, on the garage floor, wherever you have space. This isn’t just about seeing what you have; it’s about seeing what you *don’t* use, what’s broken, and what’s duplicated. It’s often an eye-opening, almost therapeutic process, albeit a messy one initially. I remember the shock when I realized I had three identical corded drills, each buried under a pile of sawdust and forgotten projects. It was an ‘aha!’ moment that highlighted just how much inefficiency was creeping into my workshop. This full inventory allows you to truly understand the scope of the problem and, more importantly, to identify the tools that are truly essential to your workflow and those that are just taking up valuable real estate, collecting dust.
Decluttering with Purpose: The ‘Keep, Donate, Recycle’ Method
Once everything is exposed, it’s time for a ruthless purge. This is where the emotional attachment to tools can really test you, but be strong! For every item, ask yourself: have I used this in the last year? Is it functional? Do I have another tool that does the same job better? I personally use a three-pile
Categorizing Your Arsenal: Grouping for Maximum Efficiency
After the purge, you’ll be left with your essential tools. Now, the next logical step is to categorize them. Think about how you *use* your tools. Do you often use your drill and impact driver together? Do all your sanding tools and accessories belong in one place? Consider grouping by power source (corded, cordless), by function (drilling, cutting, fastening), or by project type (woodworking, metalworking, general DIY). For instance, I keep all my cordless drills, impact drivers, and their respective battery chargers and bit sets in one modular box. My cutting tools – circular saws, jigsaws, miter saw accessories – are in another. This approach, rather than just throwing similar tools together, helps you grab exactly what you need for a specific task without rummaging. It’s about creating logical zones that mimic your actual workflow, reducing the mental load and physical effort every time you start a new task. I’ve found that this simple grouping strategy cuts down on project setup time dramatically because I’m not searching for that one elusive blade or adapter; it’s right where it should be.
Strategic Storage Solutions: Beyond the Basic Box
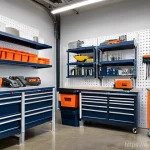
Once you know what you have and how you want to group it, it’s time to think about the actual storage solutions. This is where the magic really happens, and frankly, where I get a bit obsessed. Forget the flimsy plastic bins of yesteryear. We’re talking about integrated, robust, and highly customizable systems that protect your investment and make access a breeze. My personal journey through various storage types has taught me that investing in quality pays dividends in tool longevity and sheer frustration avoidance. I’ve seen too many tools damaged because they were just thrown into a generic bucket, banging against each other. The right storage isn’t just a container; it’s an extension of your workshop’s efficiency.
Modular Systems: The Game-Changers (Packout, ToughSystem, etc.)
If there’s one piece of advice I can give, it’s to seriously consider investing in a modular storage system like Milwaukee PACKOUT, DeWalt ToughSystem, or Ridgid PRO Gear. These aren’t just toolboxes; they’re interconnected ecosystems designed for stackability, portability, and robust protection. I remember the days of carrying three different, unrelated toolboxes, each awkwardly shaped, struggling to make one trip from the truck to the job site. Switching to a modular system was a revelation. I could stack my power tools, hand tools, and accessories onto a single rolling cart and easily move everything at once. The beauty lies in their adaptability – you can customize the internal configurations with dividers and trays, ensuring that every drill bit, every driver, every battery has its own dedicated, secure spot. This not only keeps things organized but also protects your valuable tools from impacts and environmental factors. Plus, knowing that your tools are secure and weather-resistant adds a huge layer of peace of mind, especially if you’re taking them on the road.
Wall-Mounted Wonders: Pegboards and French Cleats for Vertical Space
Don’t underestimate the power of vertical storage! For tools you use frequently or those with awkward shapes, wall-mounted solutions are a game-changer. Pegboards are a classic for a reason – they’re incredibly versatile, allowing you to hang drills, wrenches, and often-used accessories directly on the wall. I’ve personally found them perfect for quick-grab items like my most-used screwdrivers or my smaller, cordless drill that I reach for constantly. However, for a more robust and professional look, I’m a huge advocate for French cleat systems. These wooden systems are incredibly strong, customizable, and allow you to create custom holders for specific tools or even small toolboxes that can be easily mounted and removed. The satisfaction of seeing a perfectly organized wall, with every tool neatly hanging in its place, is immense. It frees up valuable horizontal workbench space and makes identifying and grabbing the right tool instantaneous. It’s not just about aesthetics; it’s about creating an active, visual inventory of your tools that enhances efficiency and reduces clutter.
Optimizing for Accessibility and Workflow
Organization isn’t just about neatness; it’s fundamentally about making your work easier and more efficient. The ultimate goal is to create a setup where you can grab any tool you need within seconds, without a moment of hesitation or searching. This requires a bit of foresight and an understanding of how you naturally move and work in your space. Think about your most common tasks and arrange your tools to support those workflows. For instance, if you frequently switch between drilling and driving, having your drill, impact driver, and a selection of common bits immediately accessible will save you countless minutes over the course of a project. This isn’t a one-size-fits-all solution; it’s about tailoring your storage to *your* unique habits and the types of projects you undertake most often. I’ve often seen workshops that look pristine but are terribly inefficient because the tools are organized in a way that doesn’t match the user’s natural movements or project flow. My personal approach centers around a ‘zone’ concept, where each zone has the tools and accessories typically used for specific types of work, minimizing movement and maximizing focus.
The Golden Rule of Placement: Near Its Point of Use
This might sound obvious, but it’s astonishing how often it’s overlooked. Your most frequently used power tools – your cordless drill, impact driver, multi-tool – should be stored in the easiest, most accessible locations. This means not buried at the bottom of a heavy chest, but perhaps in a dedicated drawer right under your workbench, or on a pegboard section directly above it. Less frequently used tools, like a specialized router or a heavy-duty rotary hammer that only comes out for specific projects, can be stored in less prime real estate. The idea is to minimize the number of steps and the amount of effort it takes to retrieve and put away a tool. Think about the ‘last touch’ principle: where do you set a tool down when you’re done using it? That’s probably a good place for its permanent home. I’ve found that when tools are easy to access, I’m more likely to put them away properly, which in turn maintains the organization. It’s a virtuous cycle of efficiency and tidiness.
Labeling and Visual Cues: Your Workshop’s GPS
Even the most perfectly categorized system can fall apart if you can’t quickly identify what’s where. This is where labeling comes into its own. I’m not just talking about throwing a sticky note on a bin. Invest in a good label maker, or use clear, consistent handwriting. Label drawers, bins, and even specific compartments within larger organizers. For instance, my drawer for drill bits is broken down into clearly labeled sections for different types and sizes. Beyond text labels, consider using visual cues, especially for frequently used items. Tracing the outline of a tool on a pegboard, for example, makes it instantly clear where it belongs and, more importantly, when it’s missing. Color-coding can also be incredibly effective; perhaps all your electrical tools are in blue bins, and your plumbing tools are in green. These visual cues serve as a workshop GPS, guiding you and anyone else who might use your tools directly to what they need, eliminating wasted time searching. It’s the little details like these that elevate a good system to a great one, especially when you’re under pressure to finish a project.
The Art of Accessory Management: Bits, Blades, and Batteries
Power tools are only as good as their accessories. A high-quality drill is useless without the right bit, and a powerful saw is just a paperweight without a sharp blade. Managing these smaller, often easily lost components is arguably more challenging than organizing the tools themselves. They’re prone to scattering, mixing, and disappearing into the abyss of a cluttered workbench. This is where a focused, disciplined approach to accessory storage truly shines, preventing endless frustration and costly replacements. I’ve personally spent more time searching for a specific driver bit than I care to admit, all because I hadn’t properly set up my accessory management. The moment you decide to treat your bits, blades, and batteries with the same respect as your tools, your efficiency will skyrocket.
Dedicated Cases and Organizers: The Small Wonders
For bits, blades, and fasteners, dedicated small-parts organizers are non-negotiable. Many modular tool systems offer smaller, clear-top organizers specifically designed for these items. I highly recommend investing in these. They allow you to sort drill bits by size or type (wood, metal, masonry), keep driver bits neatly arranged, and separate different types of screws or nails. The clear lids are fantastic because you can see exactly what’s inside at a glance without having to open multiple boxes. I keep my most-used impact driver bits in a small, compact case that fits perfectly inside my main impact driver box. For saw blades, I use a slim, durable case that protects the teeth and keeps them from rattling around. This prevents damage, keeps things tidy, and ensures that when you need a specific accessory, it’s not only there but easy to find. It’s a small investment that pays off immensely in saved time and reduced frustration.
Battery Central: Charging and Storing for Longevity
Cordless tools are a modern marvel, but their efficiency hinges on properly managed batteries. A ‘battery central’ station is a must-have. This dedicated area should house all your battery chargers and a rack or shelf for your charged and uncharged batteries. Always store batteries fully charged if you’re using them frequently. For long-term storage, consult your battery manufacturer’s recommendations, but generally, a 50-70% charge in a cool, dry place is ideal. Never store batteries completely drained or fully charged for extended periods, as this can shorten their lifespan. I have a wall-mounted charging station with multiple bays, ensuring I always have a fresh battery ready to go. Knowing where every battery is and its charge status eliminates those frustrating moments when you grab a dead battery mid-project. It’s about proactive management to ensure your cordless tools are always ready for action, maximizing their potential and your productivity.
Beyond the Box: Maintenance and Digital Tracking
Organizing your tools isn’t a one-and-done deal; it’s an ongoing process that benefits immensely from regular maintenance and, for the truly dedicated, a touch of digital innovation. Think of it as caring for your investment. Just like a car needs regular oil changes, your tools and their storage system benefit from periodic attention. Neglecting this aspect can quickly lead back to the chaos you worked so hard to eliminate. Moreover, in today’s digital age, there are incredible opportunities to leverage technology to enhance your tool management, moving beyond purely physical organization to a more intelligent, responsive system. This level of dedication might seem excessive to some, but for anyone who relies heavily on their power tools, it’s a critical step in maximizing their efficiency and extending their lifespan.
Regular Clean-Up and Inspection: The Unsung Heroes of Longevity
This is where discipline truly comes into play. Make it a habit to clean your tools after each use. Wipe off sawdust, grease, or grime. Inspect cords for fraying, check blades for sharpness, and ensure all parts are secure. A quick clean-up takes minutes but prevents buildup that can lead to tool malfunction and premature wear. When you’re putting a tool back into its designated spot, give that spot a quick wipe too. Dust and debris can accumulate surprisingly quickly in toolboxes and drawers. This routine not only keeps your tools in prime working condition but also serves as a mini-inventory check, making sure everything is where it should be. I’ve caught potential issues like a loose chuck or a dull blade simply by making this a non-negotiable part of my post-project routine. It’s a small time investment that pays huge dividends in extending the life of your expensive equipment and preventing frustrating breakdowns mid-project.
| System | Key Features | Pros | Cons |
|---|---|---|---|
| Milwaukee PACKOUT | Interlocking modular system, IP65 rated, durable, wide range of boxes/organizers. | Extremely rugged, excellent weather sealing, vast ecosystem of compatible products, good resale value. | Can be heavy when fully loaded, higher initial cost, specific footprint may not fit all vehicles perfectly. |
| DeWalt ToughSystem | Stackable with metal side latches, IP65 rated, integrated wheels on some units, compatible with rack systems. | Strong latches, good weather resistance, versatile for various job site needs, often on sale. | Plastic latches can be a point of failure over time, not as many specialized internal organizers compared to others. |
| Ridgid PRO Gear | Interlocking system, good value, some wheeled options, often sold in bundles. | More budget-friendly, decent durability for DIYers and light-duty pros, easily available at Home Depot. | Latching mechanism can feel less robust than premium brands, fewer specialized inserts, limited expansion options compared to Milwaukee/DeWalt. |
Leveraging Digital Inventories and RFID for the Future
For those who want to take their tool organization to the next level, or for professionals with a large inventory, digital tracking is the frontier. Simple spreadsheet inventories can track purchase dates, serial numbers, maintenance logs, and even locations within your shop. More advanced solutions leverage QR codes or even RFID tags. Imagine scanning a QR code on a tool and instantly pulling up its last maintenance date, or using an RFID reader to quickly confirm all your tools are back in the truck before leaving a job site. While this might sound futuristic, the technology is readily available and becoming more affordable. I’ve experimented with basic QR code labels for my less-used specialized tools, linking them to a Google Sheet that tells me exactly which box or shelf they’re on. This eliminates the frantic search for that one specific wrench I only use twice a year. It’s not just about knowing what you have, but precisely where it is, at any given moment, significantly reducing downtime and preventing costly losses. The future of tool management is smart, and incorporating digital layers is the next logical step for serious enthusiasts and professionals alike.
Future-Proofing Your Setup: Growth and Adaptability
The biggest mistake you can make with any organizational system is assuming it will be static. Your tool collection will grow, your projects will change, and your needs will evolve. A truly effective power tool organization strategy isn’t just about the present; it’s about building a system that can adapt and expand with you. This foresight prevents you from having to completely overhaul your setup every few years, saving you time, money, and a significant amount of frustration. I’ve learned this the hard way, investing in systems that were too rigid, only to find myself bottlenecked when I expanded into new types of work or acquired more specialized tools. It’s about designing a framework that allows for organic growth, ensuring that your tools remain an asset, not a burden, as your skills and projects develop.
Embracing Modularity for Scalability
This goes back to the discussion of modular systems, but it bears repeating with an emphasis on future growth. When choosing a storage system, think beyond your current needs. Will you be adding more cordless tools from the same brand? Does the system offer a wide range of compatible components – different size boxes, organizers, rolling carts, even accessories like custom foam inserts? Investing in an expandable ecosystem means you won’t outgrow your storage. You can simply add another box, a new organizer tray, or a dedicated battery case as your collection expands. This scalability is a fundamental aspect of future-proofing your workshop. It means your initial investment continues to serve you effectively, rather than becoming obsolete. I’ve seen friends who bought cheap, non-modular systems only to regret it a year later when they added a new tool family and had nowhere logical to put them, leading to a frustrating relapse into disorganization.
Regular Review and Adjustment: Your Organization Audit
Finally, and perhaps most importantly, schedule regular ‘organization audits.’ This doesn’t need to be a massive undertaking. Once every six months or annually, take an hour or two to review your system. Are you still using all the tools in your ‘keep’ pile? Are there any sections that have become cluttered again? Is there a better way to group certain items based on recent projects? Are there new storage solutions on the market that could improve your efficiency? This active review process allows you to fine-tune your setup, identify bottlenecks, and make small adjustments that prevent major overhauls down the line. It’s a proactive approach to maintaining efficiency and ensuring your power tool organization continues to serve your evolving needs. I personally mark it on my calendar as “Tool Tune-Up Day,” and it’s always worth the small time investment to keep my workshop running like a well-oiled machine, ready for any project I throw at it.
Wrapping Up Your Workshop Wizardry
And there you have it – a comprehensive roadmap to transforming your chaotic collection of power tools into a meticulously organized, highly efficient arsenal. It’s a journey, not a destination, and one that I personally guarantee will pay dividends in saved time, reduced frustration, and enhanced productivity. Remember, even starting with just one drawer or one section of your workbench can create a ripple effect of positive change. Embrace the process, be patient with yourself, and relish the satisfaction of knowing exactly where every tool and accessory lives. Your future self, mid-project, will thank you immensely for investing this time in creating a workshop that truly works for you.
Handy Tips for Your Tool Tidy-Up
1. Start Small, Dream Big: Don’t feel overwhelmed trying to organize everything at once. Pick one type of tool, like your drills, or one specific area, like a single drawer, and tackle that first. Small victories build momentum and confidence for the bigger challenge.
2. Invest in Good Lighting: A well-lit workspace isn’t just safer; it makes it easier to see what you have, identify clutter, and effectively organize. You can’t put away what you can’t see clearly.
3. Consider Portability for Frequent Use: If you often work on projects in different areas of your home or on various job sites, think about having a dedicated “grab-and-go” tote or a smaller modular box for your most frequently used cordless tools and their essential accessories. This saves set-up and pack-down time.
4. Embrace Clear Containers for Small Parts: For fasteners, drill bits, and other small components, clear plastic organizers are invaluable. Being able to see the contents at a glance eliminates endless searching and ensures you grab the right screw every time.
5. Plan for Future Acquisitions: As your skills grow and projects evolve, so too will your tool collection. When setting up your system, try to leave some room for expansion or choose modular systems that can easily integrate new storage components. This prevents immediate re-organization down the line.
Key Takeaways for an Organized Workshop
Effective power tool organization hinges on a structured approach: begin with a thorough decluttering, followed by intentional categorization based on workflow. Invest in strategic, often modular, storage solutions that optimize accessibility and protect your tools. Don’t forget meticulous management of accessories, batteries, and smaller components. Crucially, integrate regular maintenance and embrace the future with digital tracking for enhanced control. Finally, ensure your system is future-proof by prioritizing adaptability and committing to periodic reviews to sustain efficiency and maintain a functional, inspiring workspace.
Frequently Asked Questions (FAQ) 📖
Q: My toolbox is a nightmare, just like you described – a true “dump and pray” scenario. Where do I even begin when it feels completely overwhelming to tackle such a chaotic mess?
A: Oh, believe me, I’ve stared into that abyss more times than I care to count, feeling like I needed an excavator to find anything. The absolute first step, and this is crucial, isn’t buying new organizers; it’s a brutal, honest purge.
Pull everything out. And I mean everything. Lay it all out on a workbench or a tarp.
You’ll immediately spot the broken bits, the rusted screws that somehow migrated from another dimension, and the duplicate items you forgot you had. My personal breakthrough came when I realized I had three different Phillips head screwdrivers of the exact same size, all dull as butter knives.
Toss, donate, or recycle the junk. What you’re left with is your true arsenal. This initial decluttering clarifies what you actually need to organize, saving you money on organizers you don’t actually need for extraneous items.
It’s like clearing the mind before solving a puzzle.
Q: You mentioned those innovative modular storage systems, like Milwaukee Packout and DeWalt ToughSystem. They seem pricey.
A: re they truly worth the investment, and how do they make a tangible difference in real-world scenarios, whether on a job site or in a home garage? A2: That’s a question I grappled with for ages, staring at the price tags.
My initial thought was, “It’s just plastic boxes, right?” Wrong. They are absolutely, unequivocally worth it, and here’s why from someone who drags them around constantly.
Imagine being on a ladder, needing a specific bit, and knowing exactly which drawer of which stack to grab without climbing down, digging through a bucket, and then climbing back up.
That time-saving alone is priceless. Beyond that, the sheer protection they offer is phenomenal. I’ve had drills bounce in my truck bed, but inside a Packout, they’re cushioned and secure.
Plus, the ability to customize for specific tasks – one stack for plumbing, another for electrical, a third for general carpentry – means I’m only carrying what I need.
My personal favorite: using a rolling base as a makeshift work surface on an uneven lawn. They’re not just storage; they’re an extension of your workflow, a mobile workbench, and a guardian for your expensive tools.
Think of it as an investment in efficiency and tool longevity.
Q: So, I’ve finally gotten everything organized and it feels amazing! But I’m terrified it’ll revert back to that “tangled mess” again. What are your best tips for maintaining that perfect, productive setup once you’ve put in all the hard work?
A: Oh, that fear is real! It’s like cleaning your house only for a toddler to enter. The trick isn’t perfection, it’s consistency and building habits.
First, embrace the “a place for everything, and everything in its place” mantra. Seriously, if a tool doesn’t have a designated spot, it’s destined to float around and create chaos.
My rule of thumb is a quick 5-minute tidy-up after every project, no matter how small. Just put away the last few things you used. What changed my game was labeling everything – not just the outside of the boxes, but even inside drawers if you have multiple compartments.
A quick glance saves time and prevents you from putting things back incorrectly. And here’s a big one: regularly audit your setup. Maybe once every six months, pull out a drawer, reassess, and see if your needs have changed.
Tools evolve, projects evolve, and your storage should, too. It’s a living system, not a static monument. Keeping it tidy becomes second nature when you see the tangible benefits of smooth, frustration-free work.
📚 References
Wikipedia Encyclopedia
구글 검색 결과
구글 검색 결과
구글 검색 결과
구글 검색 결과
구글 검색 결과