Hey there, fellow DIY enthusiasts and home improvement heroes! You know that exhilarating feeling when you’ve got a project buzzing in your head, a vision for a perfect deck, a renovated kitchen, or even just a new shelf?

But then reality hits: which tools do you actually *need*? The sheer endless aisles of drills, saws, sanders, and impact drivers can be totally overwhelming, right?
Trust me, I’ve spent countless hours, and yes, a fair bit of my hard-earned cash, trying to figure out which power tools truly deliver and which are just collecting dust in the garage.
Over the years, I’ve seen firsthand how quickly technology evolves in the power tool world. From brushless motors offering incredible efficiency to smart tools that connect to your phone, there’s always something new hitting the market, promising to make our lives easier.
But are they all worth the hype? And more importantly, which ones will give you the most bang for your buck and stand up to years of hard work? This isn’t just about raw power; it’s about precision, durability, and that satisfying feeling of a job well done.
I’ve rolled up my sleeves, put these machines through their paces in my own workshop and on various projects, and I’m ready to share my absolute top picks.
I’m talking about the workhorses that have saved me time, prevented countless headaches, and helped me achieve genuinely professional-looking results.
So, if you’re ready to cut through the noise, upgrade your toolkit, or just find that one perfect tool to tackle your next big project without buyer’s remorse, then you’ve come to the right place.
I’ve distilled all my hands-on experience and extensive research into a definitive guide to the best power tools available today. Let’s unravel all the essential insights together below!
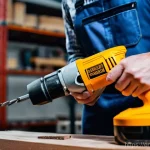
Your First Power Tool Love: The Indispensable Drill and Driver Duo
Okay, let’s be real. If you’re just starting your DIY journey or even if you’re a seasoned pro, the first power tool you probably fell in love with, and arguably the most versatile, is your drill/driver. I know for me, it was love at first squeeze of the trigger! It’s the tool that tackles everything from assembling flat-pack furniture (we’ve all been there) to drilling pilot holes for a new deck, and even mixing paint. Seriously, my cordless drill has been through thick and thin with me. I remember one weekend trying to hang a particularly stubborn shelf in an old plaster wall – without my trusty drill, I’d still be there, probably with a sore arm and a very crooked shelf. It’s not just about drilling holes; it’s about having the right amount of torque and control to drive screws flush without stripping them, which is an art form in itself. Over the years, I’ve tried so many different brands and models, and what I’ve learned is that investing a little more in a good quality drill really pays off in the long run. Look for features like a comfortable grip, variable speed settings, and a good clutch system – these are game-changers for precision and preventing fatigue during those longer projects.
The Everyday Workhorse: Cordless Drills
My absolute go-to for probably 90% of my projects is a solid cordless drill. The freedom of not being tethered to an outlet is just… liberating! I’ve been through phases with various voltages, from the lighter 12V models that are perfect for smaller tasks and working in tight spaces, to the robust 18V (and even 20V Max, depending on the brand) versions that power through almost anything you throw at them. What I’ve personally found is that a good 18V brushless drill offers the sweet spot between power, battery life, and overall weight. Brushless motors are a relatively newer advancement, but trust me, they make a huge difference. They run cooler, last longer, and give you more power and run time on a single charge. When I was building my garden shed, my brushless drill was an absolute beast, driving hundreds of screws without breaking a sweat, while my older brushed model would have probably given up halfway through. It’s all about efficiency and durability, especially when you’re relying on your tools day in and day out.
Beyond the Drill: The Impact Driver Advantage
Now, while your drill is amazing, there’s a whole other level of power for driving screws, and that’s where the impact driver truly shines. For years, I just used my drill for everything, thinking, “a screw is a screw, right?” Oh, how wrong I was! The first time I used an impact driver, it was like a revelation. The way it delivers short, powerful rotational blows makes driving long screws, lag bolts, or even just a lot of screws incredibly fast and effortless. It’s particularly fantastic when you’re working with tougher materials, like hardwoods or dense composite decking. You know that annoying feeling when your drill starts to twist your wrist as it tries to drive a screw? An impact driver eliminates that entirely. I regularly grab my impact driver when I’m working on framing, building outdoor furniture, or any project where I need serious driving power without stripping screw heads or straining my arm. It has genuinely saved my wrists from countless aches and pains on big projects, and honestly, once you try one, you’ll wonder how you ever lived without it.
Mastering the Cut: When to Reach for Which Saw
Oh, the world of saws! It can be a little intimidating, right? From the whirring blades of circular saws to the intricate dance of a jigsaw, each one has its own personality and its own perfect purpose. I remember standing in the hardware store years ago, utterly overwhelmed by the sheer variety, wondering if I really needed *all* of them. The truth is, while you probably won’t need every single saw out there unless you’re running a full-blown workshop, knowing which saw to grab for a specific job makes all the difference. I’ve learned through trial and error (and a few botched cuts, I’ll admit!) that having the right saw for the job not only ensures cleaner, more accurate results but also makes the whole process safer and much less frustrating. There’s a distinct satisfaction that comes from making a perfect, clean cut with the right blade and tool, and it really elevates the quality of your finished project. Don’t be afraid to experiment a little, but always prioritize safety and take your time to understand each saw’s capabilities.
Straight Lines & Crosscuts: Circular Saws and Miter Saws
For making straight, consistent cuts in larger pieces of wood, plywood, or even metal (with the right blade, of course), the circular saw is an absolute powerhouse. It’s one of those tools that, once you get the hang of it, feels like an extension of your arm. I’ve used mine for everything from breaking down full sheets of plywood for cabinets to trimming fence posts and making rough cuts for framing. The portability is a huge bonus, allowing you to bring the tool to the material, which is often much easier than trying to wrestle a big sheet of plywood onto a workbench. However, for those perfectly precise crosscuts, especially when building furniture, picture frames, or doing any kind of trim work, a miter saw is your best friend. Oh, how I adore my miter saw! The first time I built a bookshelf with perfectly flush joints, I knew I was hooked. It’s fantastic for repeatable, angled cuts and bevels, making intricate joinery a breeze. While a circular saw is great for general rips and crosscuts, a good miter saw truly excels at accuracy for those finish-quality projects.
Curves and Corners: Jigsaws and Reciprocating Saws
When your project demands curves, intricate shapes, or cuts that start from the middle of a piece of material, the jigsaw steps into the spotlight. This is the tool I reach for when I’m cutting out sink holes in countertops, making custom designs for shelves, or even just tackling irregularly shaped pieces of wood. It’s incredibly versatile, especially with the wide array of blades available for different materials, from wood to metal to plastics. While it’s not known for perfectly straight cuts over long distances, its maneuverability is unmatched for detailed work. On the other hand, for demolition, rough cuts, or cutting through materials you wouldn’t dare touch with a precision saw, the reciprocating saw (often affectionately called a “recip saw” or “saws-all”) is your brute force hero. I’ve used mine to tear down old decks, cut through stubborn tree roots, and even dismantle metal pipes during a bathroom reno. It’s not pretty, but it gets the job done when you need raw power to cut through anything in its path. It’s the kind of tool that makes you feel like you can conquer any demolition task.
The Art of the Finish: Sanding and Polishing Your Way to Perfection
After all the cutting, drilling, and assembling, there comes a point where you need to make your project truly shine. And for that, my friends, you need to master the art of the finish. There’s nothing quite as satisfying as running your hand over a perfectly smooth piece of wood, knowing that every imperfection has been meticulously buffed away. I used to dread sanding; it felt like a never-ending chore, messy and tedious. But once I started using the right power sanders, it totally transformed my perspective. It’s not just about getting rid of rough edges; it’s about preparing the surface for stain or paint so that your efforts really pop. A poorly sanded surface will always show, no matter how expensive your finish is. I’ve learned that patience and choosing the right grit sequence are absolutely crucial here. Don’t rush it, and let the tool do the work. It makes such a difference in the final look and feel of whatever you’re creating.
Smooth Operator: Orbital and Sheet Sanders
For general sanding tasks, especially on larger, flat surfaces, a random orbital sander is an absolute revelation. If you only buy one sander, this is the one! Its unique random orbit pattern helps to prevent swirl marks, giving you a much smoother, more uniform finish than a traditional vibratory sander. I’ve used my random orbital sander on countless projects, from preparing tabletops for staining to smoothing out cabinet doors before painting. It’s fast, efficient, and relatively easy to control. For larger surfaces like full sheets of plywood or old doors, a sheet sander (or palm sander) can also be really handy. While it doesn’t offer the same swirl-free finish as an orbital sander, it uses standard sandpaper sheets, which can sometimes be more economical, and it’s fantastic for quickly removing material or getting into corners a bit better. The choice often comes down to the desired finish quality and the scale of the area you’re working on. For most DIYers, the random orbital sander is the undisputed champion for general-purpose smoothing.
The Finer Details: Detail Sanders and Polishing
Sometimes, your project has intricate details, tight corners, or delicate curves that a larger sander simply can’t reach. That’s when a detail sander becomes your secret weapon. Shaped like an iron, with a pointed tip, it’s perfect for getting into those awkward spots where a random orbital sander just won’t fit. I’ve used mine for sanding cabinet trim, intricate carvings, or even just touching up corners on furniture. It’s not for speed, but for precision and getting those tiny spots absolutely perfect. And once your surface is perfectly smooth, if you’re working with something like a car, boat, or even a highly polished piece of epoxy resin, a dedicated polisher can bring out an incredible shine. While often considered a more specialized tool, a good polisher, sometimes even just an orbital sander with a polishing pad attachment, can transform a dull surface into a gleaming masterpiece. It’s all about bringing out the best in your materials and adding that professional, showroom-quality gleam to your hard work.
Unleashing the Torque: Understanding Impact Drivers and Wrenches
Alright, let’s talk about torque, the unsung hero of many heavy-duty projects. There’s a distinct sound an impact tool makes – that rhythmic hammering – and once you hear it, you know serious business is about to go down. I’ve developed a real appreciation for impact tools over the years, especially as my projects have grown in complexity and scale. Trying to bust loose a rusted bolt with a regular wrench or drive a massive lag screw with just a drill can be an exercise in futility, not to mention a great way to strip fasteners or wear out your tools (and yourself!). That’s where the magic of impact action comes in. It’s a game-changer for anything that requires high torque and the ability to handle stubborn fasteners without breaking a sweat. If you’re getting into automotive work, heavy construction, or just dealing with some seriously tough hardware, these tools are going to be your new best friends. They deliver power in a way that minimizes kickback to the user, making them surprisingly comfortable to use for prolonged periods, even when tackling the most challenging tasks.
Impact Driver vs. Drill: The Crucial Differences
We touched on impact drivers earlier, but it’s worth reiterating why they’re not just a “stronger drill.” A drill applies continuous rotational force, while an impact driver delivers concussive blows that help it overcome resistance. Think of it like a rapid-fire hammer pushing the screw forward while simultaneously turning it. This makes it incredibly efficient for driving screws, especially long or large ones, into dense materials without cam-out (where the bit slips out of the screw head). I remember attempting to build a really robust workbench using thick timbers and large construction screws. My regular drill struggled, and I was constantly stripping screw heads. The moment I switched to an impact driver, those screws sank in effortlessly, flush and secure. It was a completely different experience. Impact drivers are typically lighter and more compact than drills with similar power, making them great for overhead work or tight spaces. They use hex-shank bits, so you’ll need a separate set of impact-rated bits, but trust me, it’s worth it for the performance boost.
Heavy Duty Hero: Impact Wrenches for Automotive & Beyond
Now, if impact drivers are great for screws, then impact wrenches are the undisputed champions for bolts and nuts. If you’ve ever tried to remove a rusted lug nut from a car tire with a standard wrench, you know the struggle – knuckles skinned, muscles aching, and often, the bolt still stuck. An impact wrench solves this problem beautifully. The sheer power and speed with which they can loosen or tighten stubborn fasteners is astonishing. I bought my first cordless impact wrench when I started doing more maintenance on my old pickup truck, and it literally changed my life. Swapping tires, working on suspension components, or anything that involves large, tight bolts became a hundred times easier and faster. They come in various sizes, often measured by their drive size (e.g., 1/2-inch, 3/8-inch), and the larger the drive, generally the more torque they can deliver. While they might be overkill for everyday DIY, if you’re into automotive work, heavy equipment repair, or even just assembling large metal structures, a good impact wrench is an investment you will never regret. It’s pure, unadulterated power designed to save you a ton of effort and frustration.
Beyond the Basics: Specialized Tools for Next-Level DIYers
Once you’ve got your core set of drills, saws, and sanders, you might start looking around for tools that can really elevate your projects and allow you to tackle more intricate or challenging tasks. This is where the world of specialized power tools opens up, and honestly, it’s a lot of fun to explore! These aren’t necessarily the tools you’ll grab every single day, but when you *do* need them, they are absolutely invaluable. They allow you to add custom touches, achieve professional-grade finishes, and simply broaden the scope of what you can accomplish in your workshop or around the house. I remember feeling a bit intimidated by some of these tools initially, thinking they were only for professional carpenters or tradespeople. But with a little practice and a good understanding of their capabilities, even a dedicated DIYer can produce amazing results. Don’t be afraid to step outside your comfort zone and try something new; that’s where true growth in your skills happens!
Precision Power: Routers for Custom Woodwork
If you’re looking to add decorative edges, create precise dados and grooves for joinery, or even trim laminate and veneers, a router is an incredibly powerful and versatile tool. It took me a while to get comfortable with mine, but once I did, it completely transformed my woodworking projects. I’ve used my router to create beautiful round-overs on table edges, cut intricate profiles for custom molding, and even make perfectly fitting mortise and tenon joints. The sheer variety of bits available means you can achieve almost any profile or cut imaginable. There are handheld plunge routers for freehand work and fixed-base routers that are often mounted in a router table for more controlled, repeatable cuts. For a DIYer, a good quality plunge router is often the best starting point as it offers a lot of flexibility. Just be sure to invest in good quality bits and learn proper safety techniques, as these tools can be quite aggressive. The level of customization and professional finish you can achieve with a router is simply unmatched by hand tools.
Heat and Glue: Multi-Purpose Tools You Didn’t Know You Needed

Beyond the typical cutting and drilling tools, there are a few specialized gems that, while not always considered “power tools” in the traditional sense, can make a huge difference in your projects. Take, for example, a heat gun. I initially thought it was just for stripping paint, but oh boy, is it more than that! I’ve used my heat gun for shrinking heat-shrink tubing on electrical projects, bending PVC pipes for custom plumbing, removing stubborn stickers or vinyl, and even speeding up the drying time of paint or glue in a pinch. It’s surprisingly versatile. Another often-overlooked tool that falls into this category is a good quality cordless hot glue gun. Forget those flimsy corded ones; a cordless version that uses your existing battery platform is an absolute godsend for quick fixes, temporary holds, or even crafting. I use mine constantly for holding pieces in place before screwing them, repairing small items, or adding felt pads to furniture. These might seem like minor players, but they become invaluable once you start incorporating them into your workflow, saving you time and headaches on countless small tasks.
Cutting the Cord: The Power of Portable Performance
The cordless revolution in power tools has been absolutely transformative for us DIYers. I distinctly remember the days of dragging extension cords all over the yard, tripping over them, and constantly searching for an available outlet. It was a hassle, to say the least! Now, with powerful, long-lasting batteries, we can take our tools almost anywhere, from the furthest corner of the garden to a remote job site, without ever needing to worry about finding an outlet. This freedom isn’t just about convenience; it’s about efficiency and safety. No more tangling cords means less risk of tripping and a much cleaner workspace. But navigating the world of cordless tools can be a bit tricky with all the different battery platforms and voltages. It’s not just about raw power; it’s about the entire ecosystem – the battery’s chemistry, its amp-hour rating, and how well it integrates with your chosen tools. Trust me, once you go fully cordless for your primary tools, you’ll never look back. It’s an investment in flexibility and pure, unadulterated productivity.
Battery Systems Demystified: Voltage, Amps, and Compatibility
Understanding battery systems is key to getting the most out of your cordless tools. When you see “18V,” “20V Max,” or “12V,” that’s the voltage, which generally relates to the tool’s power output. Higher voltage often means more raw power for heavier applications. Then there’s the amp-hour (Ah) rating – this tells you how long the battery will last on a single charge. A 5.0Ah battery will run a tool roughly twice as long as a 2.5Ah battery of the same voltage. For everyday drills and drivers, a 2.0Ah or 3.0Ah battery might be fine, but for power-hungry tools like circular saws or grinders, you’ll want 4.0Ah or higher to avoid constant battery swaps. The biggest consideration for me, and something I always advise, is sticking to one battery platform from a reputable brand. Most major brands like DeWalt, Makita, Milwaukee, and Ryobi offer a vast array of tools that all use the same battery system. This means you buy one set of batteries and chargers, and they power dozens of different tools. It saves a ton of money and reduces clutter in your workshop. I’ve personally committed to one brand’s 18V system, and it’s incredible how many tools I can now power with just a few batteries.
Charging Up: Smart Chargers and Battery Care
Your batteries are only as good as the care you give them, and a good charger is a crucial part of that equation. Modern “smart chargers” do more than just pump electricity into your battery; they monitor the battery’s health, prevent overcharging, and can even help balance the cells, which extends the battery’s overall lifespan. I’ve found that using the charger that came with my tools, or a compatible smart charger from the same brand, is always the best bet. Rapid chargers are fantastic for quickly getting back to work, but it’s still a good practice to let batteries cool down after heavy use before charging them. Speaking of battery care, avoiding extreme temperatures is a big one. Don’t leave your batteries baking in a hot car or freezing in an unheated garage for extended periods. When storing them for a long time, aim for about a 50% charge rather than fully charged or completely drained. Following these simple tips has significantly extended the life of my battery packs, saving me money and ensuring my tools are always ready to go when inspiration strikes.
Making Your Toolkit Work Smarter, Not Harder: Maintenance & Accessories
You’ve invested your hard-earned money and time into building a fantastic power tool collection, so the last thing you want is for them to fail on you halfway through a critical project. Just like a car needs regular oil changes, your power tools benefit immensely from a little TLC. It’s not just about extending their lifespan and protecting your investment; it’s also about ensuring they perform safely and efficiently every single time you pick them up. I’ve learned the hard way that neglecting tool maintenance can lead to frustrating breakdowns, poor performance, and even safety hazards. A dull saw blade, a grimy drill chuck, or a clogged dust port can turn a pleasant DIY session into a nightmare. But it’s not just about maintenance; it’s also about having the right accessories that unlock the full potential of your tools. A good power tool is only as good as the bits, blades, and attachments you pair it with, so don’t skimp on those vital companions!
Keeping Your Tools Tip-Top: Essential Maintenance Tips
Regular maintenance doesn’t have to be complicated, but it makes a world of difference. After every major project, or periodically for frequently used tools, take a few minutes to clean them. A simple blast of compressed air can clear dust and debris from vents and moving parts. I always use a dry cloth to wipe down tool bodies, and a soft brush to get into crevices. For tools with blades, like circular saws or miter saws, routinely inspect the blade for sharpness and damage. A dull blade isn’t just inefficient; it’s dangerous as it can cause kickback. Changing blades and bits when they’re worn out is non-negotiable for both performance and safety. On my drills and impact drivers, I make sure the chuck is clean and freely operating. For any tools that have brushes (older models or specific types), check for wear and replace them if needed. And always store your tools in a dry, organized space. Moisture is the enemy of electronics and metal, leading to rust and corrosion. A little attention goes a long way in keeping your trusty companions ready for action.
Accessorize Your Success: Bits, Blades, and Beyond
Think of your power tools as the star players, and their accessories as the incredible supporting cast that makes them shine. Having the right bits, blades, and attachments can literally transform what your tools are capable of. For drills and drivers, a high-quality set of impact-rated driver bits (Phillips, Torx, Square, Hex) is a must, along with a good selection of drill bits for wood, metal, and masonry. Don’t cheap out on these; poor quality bits strip easily and can damage your fasteners. For saws, having a variety of blades – fine-tooth for smooth cuts, coarse-tooth for fast cuts, and specific blades for different materials – is crucial. I also swear by dust collection attachments for my sanders and saws; they not only keep your workspace cleaner but also significantly improve air quality. And don’t forget specialized jigs, guides, and clamps that can improve accuracy and safety. Here’s a quick overview of some essential accessories to consider:
| Accessory Type | Best For | Why You Need It |
|---|---|---|
| Impact Driver Bit Set | Driving screws quickly and efficiently | Resists cam-out, durable for high torque |
| Drill Bit Set (Wood, Metal, Masonry) | Creating clean holes in various materials | Versatility for diverse projects, prevents damage |
| Circular Saw Blades (Fine & Coarse) | Precision cuts vs. fast material removal | Optimizes cutting for project needs, improves finish |
| Sanding Discs/Sheets (Assorted Grits) | Achieving smooth finishes | Essential for surface prep, from rough to fine |
| Dust Collection Attachments | Keeping workspace clean and healthy | Reduces airborne dust, protects tools, improves visibility |
| Clamps & Vises | Securing workpieces firmly | Ensures safety and accuracy, frees up hands |
Investing in quality accessories isn’t just an add-on; it’s an integral part of maximizing your tool’s performance and ensuring your projects are a success. It’s truly amazing how a simple, well-chosen accessory can make a familiar tool feel brand new again, opening up a world of possibilities for your next big build.
Wrapping Things Up
Whew! We’ve covered a lot of ground today, haven’t we? It truly warms my heart to think about how these amazing tools empower us to bring our ideas to life, transforming raw materials into something beautiful and functional. For me, every power tool I’ve acquired, from that first trusty drill to more specialized additions, has felt like unlocking a new superpower in my DIY arsenal. Remember, it’s not just about owning the tools; it’s about understanding them, respecting their power, and continually honing your skills. Embrace the learning process, don’t be afraid to make a mistake or two (we all do!), and always prioritize safety. The satisfaction that comes from stepping back and admiring a project you’ve completed with your own two hands, aided by these incredible machines, is truly unparalleled. Keep building, keep creating, and most importantly, keep enjoying every moment of your journey!
Useful Information to Know
1. Always wear appropriate safety gear! Eye protection, hearing protection, and gloves aren’t optional; they’re essential. A momentary lapse can lead to lifelong regrets, so make it a habit every time you power up. Your well-being is worth more than any project deadline.
2. Don’t underestimate the power of a clean workspace. A tidy environment not only makes finding your tools and materials easier but also significantly reduces the risk of accidents. Dust and clutter can hide hazards, so take a few minutes before and after each session to organize.
3. Invest in quality accessories, not just the tools themselves. A premium drill bit or saw blade can dramatically improve performance, provide cleaner cuts, and last much longer than cheap alternatives. It’s often the unsung heroes that make the biggest difference in your final results.
4. Learn to listen to your tools. Unusual noises, vibrations, or smells can be early indicators of a problem. Addressing these issues promptly can prevent costly repairs or even complete tool failure down the line. Treat them well, and they’ll serve you faithfully for years.
5. Battery management is crucial for cordless longevity. Avoid fully draining or fully charging your lithium-ion batteries for long-term storage. Aim for around a 50% charge if they’ll be sitting idle for an extended period, and always store them in a cool, dry place away from extreme temperatures.
Key Takeaways
Alright, let’s condense all this goodness into a few core ideas to keep in mind as you continue your DIY adventures! First and foremost, power tools are not just gadgets; they are true enablers that unlock incredible potential for any home improvement or crafting project. Understanding the distinct purpose of each tool, from the foundational drill to the specialized router, is key to working efficiently and achieving professional-looking results. Embracing the cordless revolution will dramatically enhance your flexibility and safety, but remember that the true power lies in smart battery management and investing in a cohesive battery platform. Finally, never overlook the critical importance of regular maintenance and pairing your tools with high-quality accessories. These seemingly small details are what truly elevate your craftsmanship, extend the life of your equipment, and ensure that every moment you spend creating is both productive and enjoyable. So, go forth, build confidently, and let your tools be the extension of your passion!
Frequently Asked Questions (FAQ) 📖
Q: With so many power tools out there, how do I even begin to choose the right one for my specific DIY projects, especially if I’m trying to avoid impulse buys?
A: Oh, I totally get it! Walking into a hardware store or browsing online can feel like stepping into a candy shop where everything looks tempting, but you know some choices will lead to buyer’s remorse.
My advice, based on years of experimenting (and admittedly, a few regrettable purchases), is to always start with the project in mind, not just the tool.
Think about the specific tasks you’ll be doing most often. Are you drilling holes, driving screws, cutting wood, or sanding surfaces? For instance, if you’re primarily building shelves or assembling furniture, a good cordless drill/driver is your absolute best friend.
If you’re cutting lumber for a deck, a circular saw becomes essential. I’ve found it incredibly helpful to list out my upcoming projects and then research the primary tools needed for each.
This helps you prioritize and ensures you’re investing in a tool that will actually see a lot of use, rather than just sitting in the garage. Also, consider the scale of your projects.
A lightweight, compact tool might be perfect for small indoor tasks, but if you’re building a shed, you’ll want something with more power and durability.
Don’t be afraid to read reviews – real user experiences are gold – but always filter them through the lens of your own needs. Trust me, a little planning goes a long way in making sure your hard-earned money lands on a tool that truly becomes a trusted companion.
Q: I’m seeing a lot of talk about “brushless” motors and “cordless systems.” What’s the deal with all this new technology, and is it really worth the extra investment for a DIYer like me?
A: That’s an excellent question, and one I’ve wrestled with myself! For years, corded tools were the undisputed kings of power and endurance, and many still are fantastic.
But let me tell you, the world of cordless technology has exploded, and it’s genuinely revolutionary. When people talk about “brushless motors,” they’re referring to an internal design that significantly improves efficiency, power output, and tool lifespan compared to older brushed motors.
What does that mean for you? Longer battery runtimes, more power for tougher tasks, and a tool that’s likely to last for years without needing maintenance.
And those “cordless systems”? That’s where the magic really happens. Brands like DeWalt, Makita, Milwaukee, and Ryobi have developed battery platforms where one battery can power dozens, sometimes hundreds, of different tools.
For me, investing in a solid 18V or 20V battery system was one of the best decisions I ever made. It means I can grab my drill, then swap the same battery into my impact driver, circular saw, or even my garden trimmer.
The convenience is unmatched, allowing me to work anywhere without hunting for outlets or dragging extension cords. While the initial investment in batteries and a charger might seem a bit higher, the versatility, portability, and sheer joy of working untethered make it absolutely worth it for almost any DIY enthusiast.
You’re not just buying a tool; you’re buying into an ecosystem that will make your future projects so much smoother.
Q: If I could only buy three power tools to start my home improvement journey, which ones would you personally recommend, and why are they so essential?
A: Oh, if I had to strip my workshop down to just three power tools, it would be a tough call, but here’s what I’d pick as the absolute cornerstone for any DIYer, based on countless projects:First up, a Cordless Drill/Driver.
This is non-negotiable. Seriously, it’s the Swiss Army knife of power tools. You’ll use it to drill pilot holes, drive screws for everything from hanging pictures to assembling furniture, and even mix paint.
Get a good quality 18V or 20V model from a reputable brand (like the ones I mentioned earlier) because its versatility will astound you. I literally use mine almost daily for something, big or small.
Secondly, a Circular Saw. This tool is your go-to for cutting wood, plywood, and even some plastics quickly and accurately. Whether you’re breaking down large sheets of plywood for a cabinet project, cutting two-by-fours for framing, or resizing shelving, a circular saw will save you an incredible amount of time and effort compared to a hand saw.
It opens up a whole new world of building possibilities that are simply too daunting without one. And my third essential pick would be an Orbital Sander.
After all that cutting and drilling, you’ll want your projects to look finished and professional, right? An orbital sander makes quick work of smoothing rough wood, preparing surfaces for paint or stain, and getting rid of imperfections.
Trying to sand everything by hand is a quick route to frustration and aching arms. Trust me, your finished projects will look so much better, and you’ll actually enjoy the sanding process a lot more with one of these in your arsenal.
These three tools—a cordless drill/driver, a circular saw, and an orbital sander—will tackle the vast majority of tasks you’ll encounter in typical home improvement and DIY projects.
Start with these, and you’ll be well-equipped to build, fix, and create almost anything you can imagine!